Showing posts with label 13@rts stickers. Show all posts

Tuesday, 17 November 2020

Find New Ways

 Cześć wszystkim,

próbowaliście już tworzyć z papierami ryżowymi? Ja dziś pokażę Wam moje kolejne podejście do nich, ale tym razem użyłem w art journalu. Wybrałem papier z kolekcji "Bella" z pięknymi zielonymi drzwiami.


Hello everyone,

have you already tried creating with rice papers? Today I will show you my next project with them, but this time I used it in art journal. I chose paper from the "Bella" collection with beautiful green doors.


Zacząłem od pokrycie stron journala białym gesso, a następnie przykleiłem na nie wydarte elementy papieru ryżowego. Do przyklejania użyłem płynnego medium akrylowego. Jest ono po wyschnięciu błyszczące, więc całość pokryłem dwoma warstwami bezbarwnego gesso, które zmatowiło strony journala.


I started by covering the journal pages with a white gesso, and then glued the pieces of rice paper to them. I used a liquid acrylic medium for sticking. It's shiny after drying, so I covered the whole thing with two layers of clear gesso, which matted the pages of the journal.


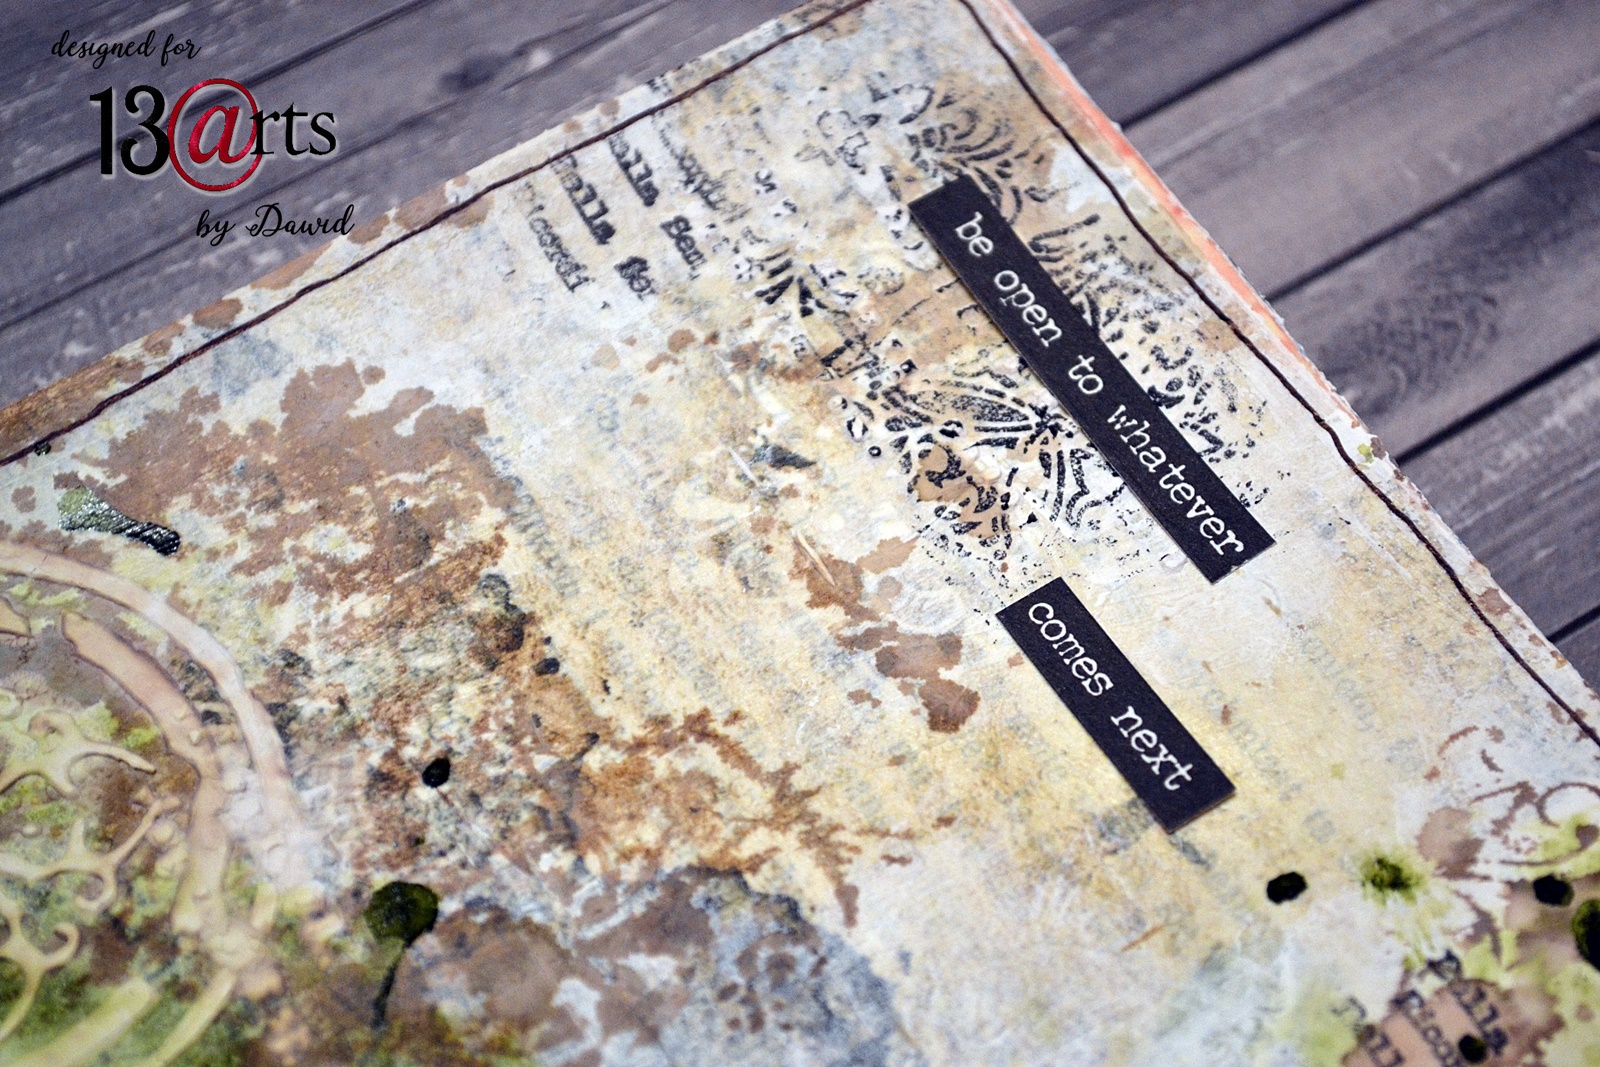
Następnie nałożyłem białe gesso używając gąbeczki. Naniosłem je tak, by brzegi były jakby naturalnie "wtopione" w tło. Dodatkowo ubrudziłem motywy białym gesso.
Następnym krokiem był kolor - wybrałem tusz wodny w kolorze green olive. Po rozprowadzeniu go zdecydowałem się dodać jeszcze nieco brązu. Naniosłem go używając maski jak stempla. 


Then I applied the white gesso using a sponge. I applied them so that the edges seemed to be naturally "blended" into the background. Additionally, I got the motifs dirty with white gesso. 
The next step was color - I chose a green olive water ink. After spreading it, I decided to add some more brown. I applied it using a stencil like a stamp.


Dodałem też nieco faktury dzięki paście modelującej i maskom. Obie strony uzupełniłem odbijając stemple w kilku miejscach. 
Na koniec dodałem napisy i zrobiłem ramkę.

I also added some texture with the modeling paste and stencils. I completed both pages by stamping stamps in several places.
Finally, I added the subtitles and made a frame.


Produkty: / Products:


Pozdrawiam,

Regards,

Dawid


Saturday, 24 October 2020

Mixed Media Scrapbook Layout "Beautiful" by Heike`s AugenBlick

 Hello my dear blog reader,

Heike here from Heike`s AugenBlick , and I am your blog host for today.


Finally my favorite season of year started, I am so happy.

October,  the start of the fall season.

Alexander Smith`s quote circumscribes the new month perfectly:

"In the entire circle of the year there are no days so delightful as those 

of a fine October".

The smell of baked apple with marzipan, hot chocolate and pumpkin soup is filling my house.

Soon the shelves will be filled with the first Christmas candy and first Christmas decoration.

So exciting!!!

But anyway, I have for you a scrapbook layout in mixed media style.

I created my page on the new paper collection Bella and Sunrise.

What I really love is to combine different paper collections.

For this page I was also inspired by the October challenge Mood Board.

Please look at the sidebar for the current challenge from 13@rts

Beautiful...


A closer look:


Here is a short description of my background.

I like to create with two strongly competing colors. 

In my case on the page the dark blue paper from the Sunrise paper collection and the 

light gray/ white Bella paper collection.

I torn the Sunrise paper and glued on the Bella paper, after that I added two layers

of clear Gesso.

My idea was that the dark side should get texture and the light side should stay flat.

So I added under the transparency a layer gel medium to one of the new stencils of 13@rts

and I covered the gel medium with two different embossing powders from WOW. 

I let the whole thing dry overnight. 

On the next day, I started with melting the embossing powder

and adding the first color layer. My color choice was burnt sienna chalk spray from 13@rts.

I added it with a plastic pipette, this is my favorite tool for adding spray color.

I applied the spray three times, always drying between the layers, for a wonderful result.

After that I added black gesso, stamp images, big black numbers and scribbeling.

Now my background was done and I started with glueing the transparency and my focale point.

I used from 13@rts:

Bella paper set : BELLA

Bella paper-sheet:  Papier-Pastel-lemons

Sunrise paper set: SUNRISE

Sunrise paper- sheet: Papier-Morning-dew

/SUNRISE-Ephemera-pack

DREAMLAND-Ephemera-pack

 Paper-clip-set

Stickers-A4-END-OF-SUMMER

ART-BOOK-vol.-1-8x8-Paper-pad

Speaking-of-which-cardstock-30x30cm title

Cardstock-elements-TRAVELLING-12x12-white-ENG mini words

Transparency-DREAMLAND

Mediums:

Gesso-Clear-500-ml

Gesso-black-500-ml

Gel-medium-500-ml

Spray: Chalk-Burnt-Sienna

Spray: Pastel-Blue

3D- balls-medium

3D- balls-Small

Brokat-konfetti

NEW-ACRYLIC-INK-Glitter-Old-Silver-30ml

Cherry-blossoms-dark-blue

Tools:

Pipette-3ml-plastic-5

Brush: 4-mm

Siliconbrush: 50mm

Here is the link to the 13@rts store: http://13arts.pl/

I hope I could inspire you a bit with my page.

Thank you so much for your visit and comment.

I really appreciate it !!

Have a beautiful day.

Until then ..

xoxo

Heike

Thursday, 10 September 2020

Couple of cards woth the new collection " DREAMLAND"

 Hello dear crafters !

My name is Andra and i will be showing you couple of cards that i have prepared for you!

Wow wow wow, i am really amazed by how beautiful all the new collections are and i had really hard time to decide, what to use first 💓 You know the feeling, when you have too many beautiful options and you would like to grab and use ALL of the possible bits and pieces 😄 Since that wasnt really an option, i chose to use mainly Dreamland💓 Such a dream to work with. As always, i have listed all the products i have used, at the end of the post.


Lets get to the pictures;


Used Materials: 

Ephemera: Dreamland
Paper: Dreamland "Wonder of nature" 
Paper: Dreamland A6 paper pad
Stickers: Dreamland
Stamp: Bella
Stencil: Roses with branch from "Sunrise" collection
Golden Acrylic ink 💓
SPLASH white
Ayeeda Mist:Chalk Dark Brown and Chalk Fuchsia
Clear Gesso
White Gesso
Gel Medium
Modeling paste


Thank You so much for stopping by and i will see you soon ! 


Tuesday, 25 August 2020

Scrapbook layout by Heike`s AugenBlick

Hello my dear blog reader, 

Heike here from Heike`s AugenBlick, designer for 13@rts.

Not only that I am your challenge host for the month of August
(I hope you saw my mood board and find the time to take part in the August challenge).
The challenge can be found on the right side from the 13@rts blog page.
But anyway:
I am here today to inspire you to create with the wonderful products of 13@rts.
I created a scrapbook layout in mixed media style.
Here is a short description about my creative process.

As always I started with adding two layers of clear gesso on both sites of my paper sheet.
After my clear gesso was dry, I started with adding texture and color.
Therefore I mixed color glow with multipurpose gel medium
and I added the mix to a stencil from 13@rts. After that I repeated
this step with  another color from color glow. I let the whole thing air dry.
In the mean time I painted my title (cardstock-words) with yellow watercolor, cut a sheet of  the Rosalie
collection with my big shot and a DIE from Tim Holtz and I painted die cut element  also with yellow watercolor.
After my texture was dry I added paint. First black gesso on the edges. Watercolor and a mix of color glow with acrylic-medium. The next step was stamping. After that I added gold glitter with the plallet-
knife to my background. I glued my focal point, embellishments / flowers, and than I added again texture but this time a mix of gel medium and 3D flakes, sequin and diamond-dust.
Finale touch splattering and scibbeling.

My photo which I used for this scrapbook layout is from:
Sacha Goldberger, born in 1968, he is a  French photographer and writer.

Paint your life...


closer look.


I used from 13@rts:

Paper pad 12x12 inch: VICTORIANA
Paper pad 6x6 inch: ROSALIE
Paper sheet 12x12 inch: Victorian-roses-Victoriana
Chipboard: Victoriana
Embellishments: Victoriana-Ephemera-pack
Transparency: DOILIES
Mediums:
Gesso clear: Gesso-Clear
Gesso black: Gesso 500-ml
Gel medium: Gel-medium-500-ml
Multipurpose gel medium: /MULTIPURPOSE-MEDIUM-500ml
Acrylic medium: Acrylic-Medium
Colors:
Watercolor: Watercolor-set-16 colors
Color glow: Coral-Red
Color glow: Fire-Opal
Color glow: Ruby
Color glow: Citrine
Rainbow color: Scarlet
Ayeeda paint: VIVID-Magenta
3D Texture:
Gold glitter: Gold
Acrylic Ink: Glitter-Old-Gold
Pink Flakes: Pink
Stencil: PIANO
Stencil: diamonds
Flowers:

Here is the link to 13@rts: http://13arts.pl/

I would like to thank you for stopping by today.
If you have question about my post, please feel free to ask
in the comment box below.

I would also like to point out that 13@rts has an open Facebook group,
where you can show your project.
Here is the link: facebook.
Have a beautiful day.
xoxo

Monday, 17 August 2020

Exploding box with Andra

 Hello, Hello !

Im happy to be your host for today and i really hope you are all having an awesome summer!
This time i have created an exploding box. They are quite time consuming to do, but oh boy, such a fun project!

Everything i have used in this project, is listed at the end of the post. Lets  get to the photos! 🥰


List of the used products:

Thank You so much for checking in and I'll see you soon!
XoXo. Anddra / Paperimirri


Friday, 10 July 2020

Happy Day Scrapbook page by Heike`s AugenBlick

Hello everyone 

and welcome to my blog post here on the blog from 13arts.
My name is Heike from Heike`s AugenBlick and I am your host for today.


For this layout I decided to work with a photo of myself. The photo was taken after my first hairdresser visit after the lockdown. I have the luck that I have been wearing my hair for about eight years now in a short grey haircut. I must say I am a big fan of short hair. 
But anyway, I will tell you a little bit about my creative steps:
After I chose my paper sheet "This moment" from the paper collection "Travel the world",
I added clear gesso to my page. I always work with two layers of clear gesso.
The clear gesso ensures that no liquid is absorbed by the paper anymore.
A perfect layer between paper and mediums. 
Then I decided to add another paper sheet to my background paper, but this time I torned it.
This paper became also two layers of clear gesso. I glued my torn paper with gel medium to my background paper.
After I found the perfect position for my photo (focal point) I have searched everything together which I used for my decoration (embellishments). The next step was creating texture 
on my background. Therefore I used the stencil Horiscope and a mix from modeling paste and 3D powder. I sprinkeled some colored grit in the wet paste. I like to air dry my mix, I think the paste looks smoother. 
For my flower chipboards I used the mini watercolorset "Travel the word" and clear ultra thick embossing powder. 
For my seahorse chipboard I used multipurpose medium and brokant hologram blue.
For the shells and explore word chipboard I used black gesso 

After my modeling was dry I stamped with black Archival Ink.
Now it was time for my paper layering behind my photo which I glued with multipurpose medium.
My next step was coloring with the mini watercolorset and the woodbine spray. After drying with the 
Heat tool, I glued my focal point and embellishments. 
The final touch gold glitter paint and sequin in turquoise, also white pen strips to some of the black splatters.
Done.

Happy day...

A closer look to my scrapbook page.


Thank you so much for visiting my blog post today.
I hope you feel a little bit inspired to create with the beautiful products of 13@rts.

As so please show us your end result on our social media page.
Here is the link to Facebook 13@rts ARTelier: facebook.


xoxo
Heike

Thursday, 18 June 2020

Mixed Media Layout by Heike`s AugenBlick

Hello everyone,

Heike here from Heike`s AugenBlick and I have today the pleasure to inspire you to work with the wonderful products of 13@rts.


The summer has arrived here in The Netherlands with days around 25 degrees Celsius. 
Wonderful to sit in the garden and enjoy the nature. 
I got a beautiful hammock with wooden stand from my handsome hubby. 
Now I have to be careful that I don't just lie in the hammock and read. 
Living is so beautiful if you know how to enjoy it. But anyway..

"FAVORITE"...
is my Steampunk inspired mixed media layout with a photo of my son Joshua.


A closer look.


Background steps on my page:
I started my mixed media layout on two sheets of paper called: Rosefield and the clock.
My first step was adding two layers of clear gesso. After everything was dry very well, I added a layer of a mix from acrylic medium, color glow topaz and rainbow color navy blue to my background.
The left over mix was for the chipboard decoration and for splatters. I decided to play along with the stencil dance of gears and a mix of multipurpose gel and color glow calcite. I dryed my background over night. The next day I started with painting around the gears with orange rainbow color and vivid orange. After the color was dry I added gold glitter to the gears and also to the blue colored chipboards. My last step on my background was adding black gesso with texture powder.
Now it was time for my focal point.