Monday, 24 August 2015

My Little Pony | Terhi Koskinen

 Hello there 13arts fans!

Terhi here with you today, and I'd like to introduce you to my new friend. Her name is My Little Pony and it makes me laugh.
I found a little horse from our local crafts store, it's made of cardboard mass and it was perfect base for a magic pony.


After two thin layers of gesso, the cardboard mass still suck all the mists I tried to use, so I added even two layers more. 
I used thread and strings to create textures, also some hot glue to adhere the strings and make more textures and details.
The hoofs are created with fine grained grits and gel medium.
And then, again another layers of gesso.


As said, I used a lot of mists to color My Little Pony.
The blue is combination of blue, indigo and black. There are also some paints used, to create more vibrant tones to coloring.


My Little Pony is clearly a unicorn, but to make her "magic wand" shine as it should shine, I used one decorative crystal on the top.
Notice her tail as well, it's an old paint brush - this the part which makes me laugh!


Thank you for coming by today!
Remember to include something funny to your creations ;)


13@rts products:

Saturday, 22 August 2015

Oh Crack ! - by Olga Heldwein

Hi there 13 Arts fans !
Olga here. Today I come to you with my work and a short video tutorial for nice trick in your backgrounds.
My work is rather simple one. I did a small round canvas and I didn't want to hide to much of a nice background.

Witajcie fani 13 Arts.
Dziś mam dla was prace i szybki tutek na spękania. Fajna szybka technika do urozmaicenia tła w pracach. Praca raczej z tych mało skomplikowanych i nie chciałam zasłonić całego tła, a wybrałam dość mały blejtramik :)


Details / Szczegóły


If you want to know how, I made those cracks with video :

Jak zrobić spękania możecie zobaczyć w filmiku. Ponieważ jest po angielsku to na szybko wytłumaczę.
Na dowolną powierzchnię zabezpieczoną cienką warstwa gel medium kładziemy równą dość grubą warstwę kleju. Zanim klej nam wyschnie, smarujemy gessem, ale staramy się nie połączyć produktów na naszej pracy.
Potem szybko suszymy nagrzewnica i obserwujemy jak nam ładnie gesso pęka :)


Material list:


Friday, 21 August 2015

Altered brush by Natalya Loi

Hi, dear scrap-friends!
Today with you Natalya and I want to show you altered paint brush.


I painted brush two layers of gesso, and then a few colors of ayeeda paints - matte pea, matte turquoise and  metallic blueIt looks great!


I added some texture paste through a stencil


 some embellishments and ayeeda 3D Powders


Finally I added colorful splashes


That’s it!


♥♥♥

Thank you for stopping by today!


Thursday, 20 August 2015

Using Stencils - Jacqueline Moore

Hello Lovely Blog Readers!! I hope this post finds you all well!

Today I would like to share with you some of the different ways you can use a stencil to get different looks. I have used the same stencil, multiple times on each of the tags below, to create different effects each time. 


 Some Details:


 Before we start playing with our stencil we need to prepare our Tags. Start by cutting to some white cardstock to the desired size, then punch a hole in the top using a hole punch.  


Then cut some 13 Arts paper to fit the top and distress the edges.


 I have used my Triangles Stencil from the Color Basics Collection.

First up are 2 very simple ways you can create a different look with your stencil, which i am sure many of you will have already tried.
On the Left I have simply placed the stencil over the tag and sprayed with 2 colors of Mist (Pastel Salmon and Raspberry). I have then lifted the stencil and placed it upside on the Tag on the Right. I have then used a tissue (I find that just using my fingers can smudge the design) to press the stencil against the tag, rubbing off the mist onto the paper, and creating a reverse print of the stencil.


Next up is of course using Modelling Paste with a stencil. You can spread the modelling Paste onto a new tag or place the stencil in a new position and apply over a tag you have just sprayed, building the pattern.
 

I have then sprayed the modelling Paste with my Mist while it was still wet. 


On the tag below I have stenciled the triangles onto the background using a lead pencil. I have moved the stencil around a few times to overlap the pattern. Next I just wiped some excess mist that was still sitting on the stencil onto the tag.


 Here I have spread a very small amount of Gel Medium through the stencil, then while the Gel was still wet sprinkled it with Light Gold Mica Flakes. I have purposely gone for an imperfect look, however you can still see the shape of the triangles in the mica, particularly on the left.


Once the Modelling Paste and Mists were completely dry on the tag below I have once again placed my stencil on it. I have then taken a stamp and black archival ink, and stamped on top of the stencil in a few places.


 These are only a few of my favorite ideas for using the same stencil in different ways. You could mix Gel Medium with Glitter, Grit, even a little Mist to create a glossy water-resistant pattern and spread through your stencil using a palette knife. You could trace the pattern onto your paper using different colors of watercolor pencil then spray with water to let the color soften. 

There is really no limit to what you can do, so pull out your supplies and stencils and see what you can come up with!!!

Thanks for stopping by! 

13 Arts Products Used:

Wednesday, 19 August 2015

Aladdin's lamp - step by step by Karolina Bukowska


Today I would like to show you  an Aladdin's lamp.
Dziś chcę pokazać lampę Alladyna.


Detals/ szczegóły :


_________________________________

Step by step 

Krok po kroku 
_________________________________


Krok/ Step 1
 I started this project with covering it with Gesso and stick some gauze with gel medium
Rozpoczynam ten projekt od nałożenia gessa i przyklejenia gazy na żel medium.


Krok/ Step 2
 I spray it with color mists and paint with Ayeeda Paints.
Pryskam mgiełkami i maluję farbkami.


Krok/ Step 3
 I start decorating the surface.
I cover the flower with gesso and mists.
Zaczynam zdobić przestrzeń.
Kwiat gessuje całość psikam mgiełką.


Krok/ Step 4
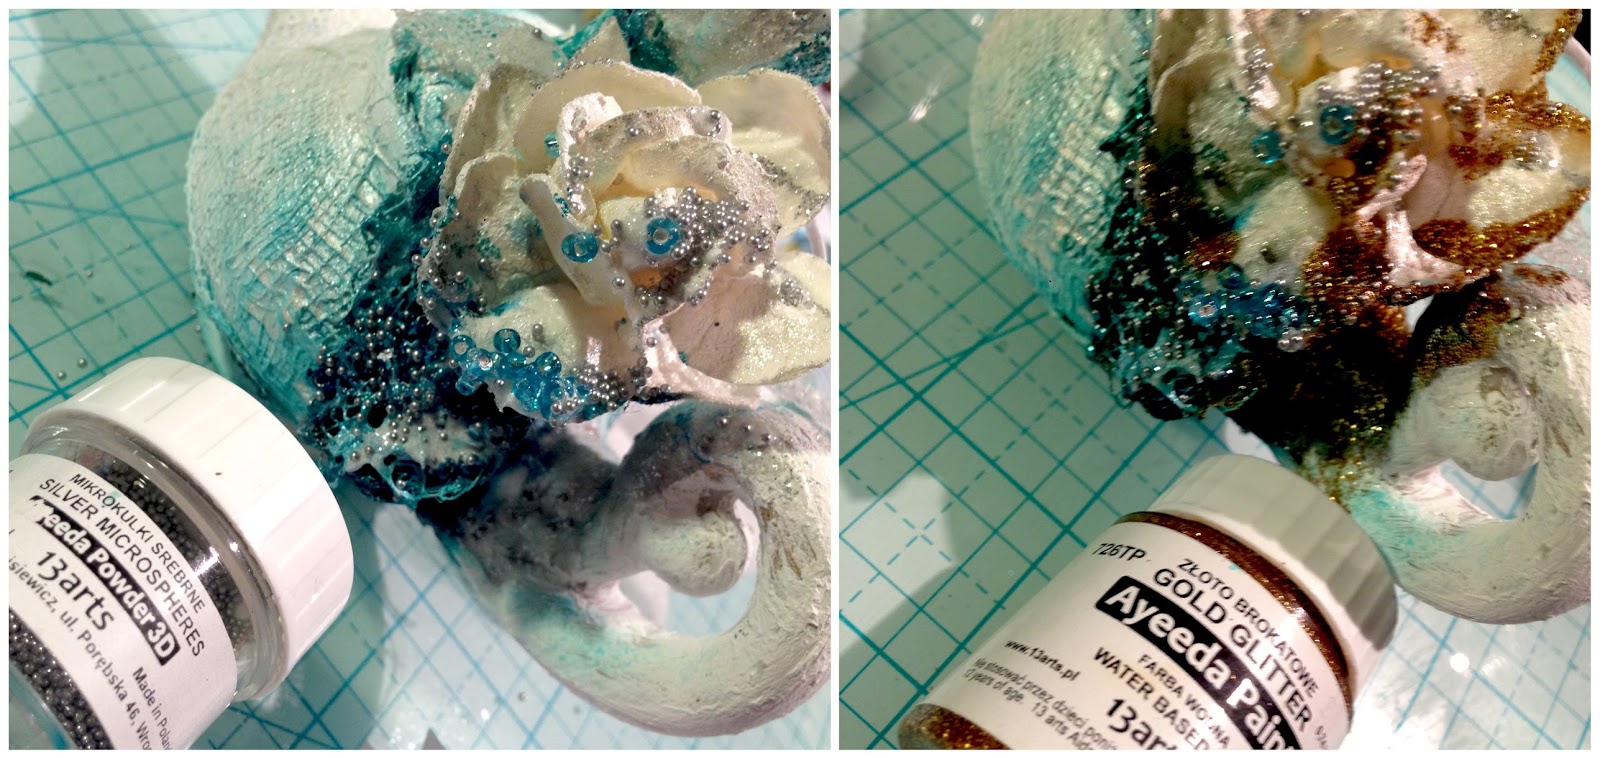
I make some shades with mists and after that I add some glitter paint and microbeads
Lampe cieniuje mgiełkami i zdobie farbami brokatowymi i  mikrokulkami.


13arts products:


Have a nice day!
Miłego dnia!


Monday, 17 August 2015

Sunday, 16 August 2015

Last projects from Lydie Denis and Fiona Paltridge

It's time to say goodbye to our talented Designers - LydieDenis and Fiona Paltridge. We will miss you Ladies! 

Czas pożegnać się z naszymi utalentowanymi projektantkami- Lydie Denis i Fioną Paltridge. Będzie nam Was brakowało Dziewczyny! Mamy nadzieję, że jeszcze zagościcie na naszym blogu :) 

***


Bonjour tout le monde !!
Hi everyone !!


This is Lydie Denis – Lilibleu, and I’m very happy to see you again with this new project.
Pour ce mois d’août, j’ai décidé de réaliser un canvas, car j’avais une énorme envie de patouille avec de beaucoup de textures !!
For august, I decided to create a canvas, for I had a huge desire to mess about with many, many textures !!
J’ai commencé par appliquer à la spatule une couche épaisse d’Acrylic Gel Medium, avant de vaporiser de l’encre dessus.
I first applied a thick coat of Acrylic Gel Medium with a palet knife, before spraying mists on it.


J’ai rajouté ensuite quelques morceaux effilochés de gaze pour donner encore plus de texture.
I then added pieces of unravelled gauze to make more texture.
Sur le chipboard dentelle que j’ai préalablement recouvert de gesso j’ai ensuite appliqué un peu de Gel Medium et de l’encre en spray.
On the lacework chipboard I previously covered with gesso, I then put a bit of Gel Medium and some sprayed mists.

Pour rajouter de la matière, j’ai déposé un peu de Silver Hologram Glitter et du Gravel Colored Grit Light Blue à plusieurs endroits sur mon canvas.
In order to add more matters, I layed a bit of Silver Hologram Glitter and of Gravel Colored Grit Light Blue on several places of my canvas.

J’ai également rajouté quelques taches d’encres noire et blanche.
I also added spots of black and white inks.


Et j'ai achevé ma décoration en rajoutant quelques fleurs et embellissements divers.
And I concluded my decoration by putting flowers and various embellishments.

13 Arts products used:
Ayeeda Powder 3D Gold Microsphéres
50 pcs Self-adhesive gems “Kid’s Fun”

***

Hello Fiona here with you for my final share as part of the Guest Design team. What an awesome journey this has been as a 13@rts Guest Designer. I have absolutely loved my time here. The team is so friendly and the products ... well what can I say, they have been my favourite ever since I first saw them being demonstrated by the very talented Aida.
My final piece for you all is a layout I created using some of the sprays from the range. I wanted to use blue hues so I picked out some of the most gorgeous blues available in the collection. That’s what I love about the 13@rts sprays, the colour range is fabulous and growing all the time. Blue is not just blue!
I wanted to show you how the sprays cling so well to any surface. For this project I have used a canvas board. I was very impressed how the colour stayed so bright even after it was dried and how, when applied on top of the wet Modeling paste, it crackled ever so slightly when I dried it with my heat tool. A brilliant effect!
I also used the Ayeeda Splash Inks in the black and white. The consistency is amazing. Thick enough to splash but thin enough to flick to get a smaller effect. The coverage with the white is amazing. Even after it has dried it is strong in colour.
  As I mentioned before, I have absolutely loved my time as part of the Guest Design team. It will be sad to say goodbye. I hope you have enjoyed seeing the projects I have created. Thank you to all of you for your support. I hope to be creating for you again one day xx
Product List:
Ayeeda Mists Pastel Blue
Ayeeda Mist Chalk Blue Light
Ayeeda Mist Chalk indigo
Ayeeda Mist Chalk Turquoise light
Ayeeda SPLASH Ink Black
Ayeeda SPLASH Ink White
Ayeeda Medium Modeling Paste
Ayeeda Medium gesso
StazOn Ink Jet Black
Ayeeda gesso

***
We really enjoyed seeing your projects here! We hope to see you again on our blog in the future :) 
Bardzo miło oglądało nam się Wasze projekty! Mamy nadzieję, że zobaczymy Was jeszcze na naszym blogu :)