Tuesday, 23 December 2014

Winter Time by Anna Rogalska

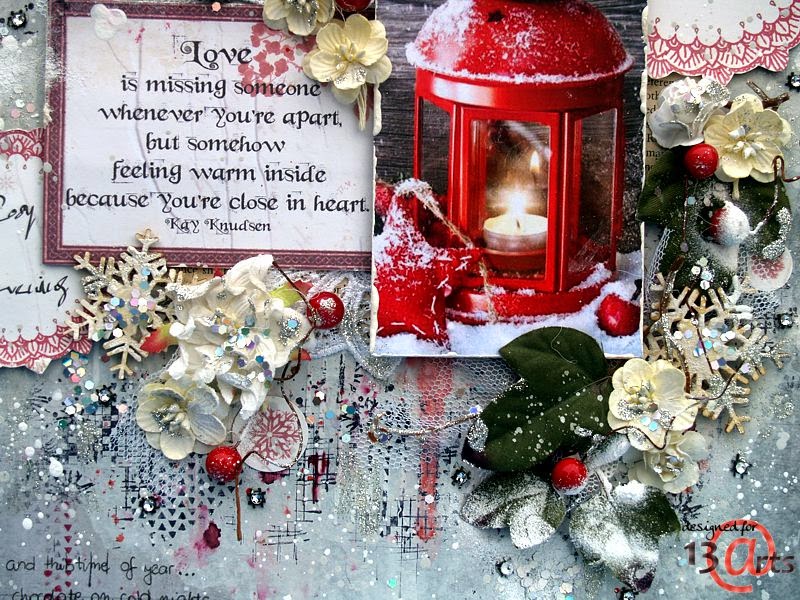
Hello everyone! It's Anna Rogalska here today to share with you a layout I created using the beautiful new Cosy Evening collection, along with many mediums, mists and paints from 13@rts!
 My layout is based on the last challenge over at Once Upon A Sketch.

Witam wszystkich! Tutaj Anna Rogalska chcąc podzielić się z Wami moim layoutem, który stworzyłam z nowej, pięknej  kolekcji Cosy Evening wraz z wieloma mediami, mgiełkami i farbami od 13@rts!
Mój layout powstał na podstawie mapki ostatniego wyzwania Once Upon A Sketch.

   
Some close-ups 
Kilka zbliżeń 


My journaling: I love December and this time of year...because...
I can drink hot chocolate on cold nights, spend time with family and make decorations for the holiday!

Mój journaling: Kocham grudzień i tę porę roku ... ponieważ...
Mogę pić gorącą czekoladę w zimne noce, spędzać czas z rodziną i robić ozdoby na święta!


***************************************************
 
Would like to wish everyone a Merry Christmas and a Very Happy and Prosperous New Year! 
Hope you all enjoy your Holidays.

Chciałabym życzyć wszystkim Wesołych Świąt oraz bardzo szczęśliwego i dostatniego Nowego Roku!  
Mam nadzieję, że wszyscy cieszycie się wypoczynkiem.


***************************************************


Monday, 22 December 2014

Black gesso- tutorial by Olga Heldwein

Hello all 13arts' Fans.
Today I would like to introduce you to black gesso and nice technique to use with it. I will show it on example of a box but it works on any surface. Black gesso is like white gesso. It's primer to all surfaces, gives black cover with matt finish. Because our surface is black, colors won't be visible on  atop but if you use metallic product you will receive nice shiny color.


Witajcie !
Dziś chciałabym pokazać wam fajną technikę do użycia z czarnym gesso. Czarne gesso to produkt identyczny jak białe, tylko w czarnym kolorze. Jest to idealna baza do wszelkich powierzchni. Zapewnia idealne krycie z pięknym matowym wykończeniem. Moją technikę pokażę na przykładzie pudełka ale możecie użyć dowolnej powierzchni. Ponieważ powierzchnia jest czarna kolor nie będzie widoczny. Żeby urozmaicić pracę, najlepiej dodać silnie połyskujący preparat. Otrzymamy efekt czarnej mieniącej się powierzchni.

First step is covering all surface with gesso.
Krok pierwszy to pokrycie całej powierzchni gesso.

Than add some texture. You can use a stencil or just glue some embellishments and cover them with nice layer of gesso. I use glass cabochons ( painted with Metallic paint from the bottom)  and I surround them with microbeads mixed with black gesso and gel medium.

Teraz trzeba dodać jakąś teksturę. Mozecie użyć maski lub przykleić dowolne ozdoby i pokryć gesso. Ja nakleiłam kaboszony pomalowane od spodu farbką mettalic i otoczyłam je mikrokulkami pomieszanymi z gesso i gel medium.

When all dry add Metallic Paint
Kiedy wyschnie dodajemy farbę Metallic
Before it's dry, add some water paint and it will start to spread
Dodajemy wodę zanim farbka wyschnie i nasz połysk zaczyna płynąć

To add some color shades use mist on the top. Dry it with heatgun and add water and mist. Try to direct where your color runs. You only want to highlight the texture- not cover everything. When you are happy with the effect do little dry brushing with gesso on the top.
Żeby urozmaicić kolor dodaję mgiełkę- zmienia kolor drobinek mojej farbki. Suszę nagrzewnicą i dodaje mgiełkę i wodę starając się pokierować moimi kolorami. Chcę tylko podkreślić teksturę nie pokryć całość kolorem. Na koniec przecieram wszystko suchym pędzlem i gesso .

And finally we get black effect with little bit of color shine.


I used:


Sunday, 21 December 2014

SCREAM!! By Terhi Koskinen

Hi there! Waiting for Christmas? Me too! But instead of Christmas layout, I have something else to share with you. Last summer, my older daughter was so very happy to spent time in a forest, she claimed up to a stone and literally screamed her happiness. Such a silly little girl!


For this layout, I used papers from one of my favorite 13arts collections, All is Love, and did you knew you can find white cardboard from our store, too?


I started to build my page with some random stamping, using black ink. Another way to use ink on this layout was to add it through a stencil, from Cosy Evening collection. There is the word "lovely" which fits perfectly to the picture there - it's my older daughter yelling her happiness out loud.
Pink color on the background is Ayeeda Pastel Pink mist, I sprayed it onto an old plastic bag, then wrapped it and pressed it against the paper. It gives such a nice effect!


Then there is lots of paper layers, more mists and tiny embellishments such as pearls and diamonds. All available in our store!


Do you remember you can find us from Instagram (13arts)? And Twitter (@13_arts)? And Facebook? And Pinterest? I hope we'll see you there :)

I wish you all calm and happy Holidays!
Terhi xx

Products used:

Saturday, 20 December 2014

Melenia dreams of a white Christmas

Hello everyone!

It's Melenia with you today, to share a really wintery layout, which speaks of my Christmas dream:
I'm dreaming of a white Christmas... just like the ones I never had (in Southern Greece where I live, we see snow only on the peaks of the mountain range)!

So like I have said in the past, the best way to imitate snow is to use Ayeeda gesso.
And this is what I did in the following page:


The Cosy Evening collection is of course the no.1 choice for winter-themed layouts so I used the Christmas Eve paper as a background.


Being a mixed-media/ink/paste girl, I could not do without my Ayeeda mists and paints!!!


As you can see, there's modelling paste and gesso everywhere around and on my cluster!! I also added splatters of ink!

Products used:


I hope you like my page!  


Friday, 19 December 2014

Winter tags by Natalya Loi

Hi!
Natalya is here.
Today I want to show you two winter tags. They are made from a beautiful collection  "Cosy Evening"


The first tag is with a large flower which I cut out of paper


background is created using texture paste, ayeeda mists and glitter


The second tag is with cute Christmas trees, I also cut-out them from a sheet of paper from "Cosy Evening" collection


 there are also a lot of glitter and microspheres


 ♥♥♥


All the best! And a Merry Christmas!
Natalya Loi with ♥


Tuesday, 16 December 2014

Family Journal - by Jacqueline Moore

Hi everyone!! Today I would like to share with you my most recent creation..... A beautiful new Art Journal I created using one of my Moms old Jackie Collins novels, and lots of beautiful 13 Arts products!!

I must confess that this journal cover is a little different from what I would normally do, but after all the whole purpose of an Art Journal is to experiment is it not? And I love how it has turned out!!!

'Family Journal'


I began by cutting a hole in the front cover and threading my ribbon through, before covering with paper from the Fly Away collection. I then built up my background composition using lots of lace and other materials, embellishments and found objects. I glued the heavier objects down using Gel Medium, and when everything was secure I painted everything with Gesso to provide a grip for the color.

Some close-ups:


When my Gesso was dry I began to paint the background, starting with Ayeeda Paint in Matte Black. I used this to create shadows and put emphasis on the dimension.


After the black I continued to add color using paints, mists and inks, starting from the lightest, and building up to the darkest, and occasionally spraying with water to blend colors together.


When I was happy with the color I added a few sprays of Pastel Black Mist to pull the color and shadows together. I also added some flicks and drops of Black Ink. I finished off with a few sprays and flicks of Chalk White Mist, and randomly brushing Ayeeda Paint in Gold Glitter around the embellishments and lace.

 I hope you found something to inspire you here!!!

This is my final post until January so before I go today I would like to wish you all 'A Very Wonderful Christmas and A Happy New Year'


13 Arts products Used:
Fly Away Paper - Fleeting Moments
Ayeeda Paint - Matte Black
Ayeeda Paint - Matte Yellow
Ayeeda Paint - Matte Cinnamon
Ayeeda Paint - Matte Sand
Ayeeda Paint - Matte Caramel
Ayeeda Paint - Gold Glitter
Ayeeda Mist - Pastel Caramel
Ayeeda Mist - Pastel Black
Ayeeda Mist- Chalk White 
Ayeeda Mist - Chalk Yellow Amber
Ayeeda Water Ink - Black (Graphite)
Ayeeda Water Ink - Orange 


Monday, 15 December 2014

Gel Medium vs Liquid Acrylic Medium by Magda Polakow

Hi everyone!
I love experimenting with products. This time I used Gel Medium and Liquid Acrylic Medium in the same ways. Because this mediums are completely different, I didn't achieved the same effects.


First I applied both mediums on paper. I used brush and did it only in a few places. 
After drying time I almost couldn't see any changes on a paper with Liquid Acrylic Medium. The paper was a little glossy but that's it, paper remain soft in touch.
On the other hand paper with Gel Medium was glossy and I felt a layer of gel medium when touched it.

I wanted to see how both mediums would react with mists. I sprayed Pearl Mist in three colours and dried the paper using a heat gun.
Result...


The next step...a thick layer of mediums - Liquid Acrylic Medium (left) and Gel Medium (right).


I sprayed Pastel Black on both mediums - they were still wet.
On a layer of Liquid Acrylic Medium (left) the mist was moving (more about this technique you can read here). When used a heat gun, spots appeared and I could see what was under the layer of Liquid Acrylic Medium.
The mist on a layer of Gel Medium stayed in one place but what was interesting - heated with gun cracks appeared.


And here is one more reason why I like Liquid Acrylic Medium so much...


I wrote about Liquid Acrylic Medium before. Two posts full of ideas you can find here and here.