It's time to introduce you to our new wonderful and talented Guest- Fiona Paltrige. Fiona created a fresh and beautiful layout for us! Would you like to know something more about our Guest? Here's her bio:
Witajcie!
Czas przedstawić Wam naszego kolejnego i utalentowanego Gościa- Fionę Paltrige. Fiona przygotowała dla nas piękny, świeży layout. Chcielibyście dowiedzieć się trochę więcej na temat naszego Gościa? Oto jej biografia:
Hi! My name is Fiona & I live in South Australia with my husband. I have 2 adult children who have both moved away to pursue their careers. I have been a scrapbooker for over 15 years now but I have only recently discovered the online world of challenges & design teams! I'm enjoying meeting so many amazing & talented people & having a chance to share my love of creating as well as being exposed to a never-ending stream of ideas, techniques & wonderful creations from my online compatriots.
My work is often contemporary & I absolutely love using mixed media in my projects. Since I've discovered modelling paste, gesso, sprays & watercolours I have loved using them in everything I create!
I currently design for teams both in Australia and Internationaly ranging from a kit club to a couple of challenge blogs & an Australian chipboard product company. I am also a current Scrapbooking Memories Master for Scrapbooking Memories Magazine.
I am really looking forward to sharing and learning as part of the 13@rts Guest Design Team.
I am so excited to be sharing with you
my first creation as a Guest Designer for 13@rts this month. I
couldn’t wait to try out the new collection “Mental Vacation”
so I chose my favourite background “Summer Snow” and added the
Tattered Circles Stencil using some Ayeeda modelling paste.
Circles then became a theme of my
background and I painted some free hand on to the background using
the Ayeeda Mists Pastel Lime.
Continuing with the circle theme, I cut
out several circles and covered them in coloured grit in the light
blue and the glass microspheres. I adhered them with the Ayeeda Gel
Medium and when they were dry I added a touch of the Matte Paint in
the Turquoise.
I combined the Ayeeda Mist colours
Pastel Turquoise and Pastel Lime to bring out the colour of the
background and to enhance the photo. I finished the piece off by
adding some acrylic SPLASH Ink in the black.
I absolutely love this colour
combination. I’ll have to try it again on another project. Thank
you for popping in. See you again next month. Product List:
Today
I want to share with you a my new layout. I created it using a lots of
13arts mediums and the amazing papers from different collections.
Cześć wszystkim! Tutaj Anna:) Dziś mam dla Wasnowy layout. Stworzyłamgoprzy użyciusporej ilości mediów 13artsiniesamowitychpapierów zróżnych kolekcji.
My title which is a chipboard piece "Starlight-words". Background is created with mists and water, then some stencil work with modelling paste. Then I finished off with some Splash acrylic ink in white, pink and black.
Mój tytuł to ozdobna tekturka "Starlight-words".
Tło zrobiłam z pomocą mgiełek i wody, później maski z pastą modelującą.
Następnie wykończyłam pracę tuszami akrylowymi Splash w kolorach
białym, różowym oraz czarnym.
It's Terhi here today with two mixed media cards. Below you'll find a process video, but let me tell you something first.
I'm not a card maker. Or that's what I thought - but turning simple cards into mixed media creations is something I really love. Or new products, such as grits and mica flakes can be used on cards, too.
For me, white space on any creations is a must thing. That's why I taped the card templates onto my worktable with washi tape. And once the card were finished I took the tapes of and had neat white lines. Easy tip to layout, too!
Adding a lot of layers and embellishments was fun. And I used Pearl Mists to color the creation.
I only wonder how to put these thick cards into an envelope ;)
I hope you'll enjoy my process video, we'll see you soon!
I'm in to share a quick card using some of the fabulous products in their store. I'm using turquoise and pink, which for reason give a really shabby feel to everything.
My background is a very simple sheet of white cardstock. I have not used those for awhile now but I'm re-discovering just how versatile (and fun) they are to use. Background is very simple stenciling and painting with light turquoise chalk mist in two layers - one watered down first coat and a second more intense coat with just enough water for drips. The gradation of tones create a very eye-catching and pleasing effect. I didn't splatter the whole background with color because I want some of the white from the modeling paste to give relief and contrast to the white cardstock.
Some close-ups:
Creating lots of texture with different fabric layers. My wooden bird was first covered with White Matt Paint followed by watered down Metallic Turquoise paint. Beneath that is a left-over piece of chain chippie (from Blue Fern Studios) which I had painted with Old Silver Metallic Paint. The resin frame was given generous drops of slightly watered Metallic Turquoise paint.
Some more textural detail using silver and clear microspheres, as well as the bigger plastic spheres with mica flakes. My roses were white to start with but I altered them with dabs of Raspberry Matt paint. Everything on the white cardstock is then mounted onto a sheet I trimmed out from Mental Vacation (Summer Snow).
It's Marta here. Today I would like to show you my project full of my favourite 13arts' flowers. When I saw this lovely picture of this cute little lady I knew I need to make something with it :) I decided to make a frame on canvas
Witajcie!
Dzisiaj chciałabym Wam pokazać mój projekt pełen 13artsowych kwiatów. Kiedy zobaczyłam te słodkie zdjęcie pewnej uroczej małej damy wiedziałam, że muszę coś z nim zrobić. Postawiłam na ramkę na blejtramie.
Did you know, that 13arts' flowers are handmade? I love them. They are big and rich. In 13arts' store you can also find many nice twigs and stamens. You can use them as a part of your own flowers or just as a decoration.
Czy wiedzieliście, że kwiaty 13arts są ręcznie robione? Uwielbiam ich używać. Są duże i rozłożyste. W sklepie 13arts znajdziecie też mnóstwo ślicznych gałązek i pręcików. Możecie ich użyć do stworzenia własnych kwiatów, lub po prostu jako ozdoby.
In the background I used a chipboard doily. I covered it with white splash ink which gave it a nice shiny effect.
W tle użyłam tekturkowej serwetki. Pokryłam ją warstwą białego splasha, co nadało jej ładny, błyszczący efekt.
Olga's Here :) I made a Quick test of Inks that you can lately find in 13 arts' store. All made by TSUKINEKO. All are special kind of inks we picked for our Mixed Media lovers . To compare them I checked if they have and how much of abilities that I expect from my ink and I would like to share my opinion. Every time I stamped in the same order.
Heja !
Tu Olga. Dziś chciałabym wam przybliżyć temat tuszy. Od niedawna mamy w 13 arts wybór tuszy TSUKINEKO i pozwoliłam sobie na małe porównanie ich właściwości. W końcu dobry tusz to podstawa. Sprawdziłam je bardzo subiektywnie pod względem tego czego ja oczekuję od tuszu. Za każdym razem stemplowałam w tej samej kolejności .Tusz memento jest ten sam tylko w dwóch kolorach dla porównania odcienia
First I stamped on regular not fancy paper to see how the ink will behave.
You can see that all my inks managed to give me nice sharp image . Maybe
from stazon it's a little bit blured on the edges. Interesting thing is
that Memonto and Memonto Luxe have exactly the same name for ink shade
and colors are totaly different. Memento luxe is more reddish and less
faded color.
Porównanie odbitki . Jak widzicie wszystkie tusze
dały mi ładną odbitkę na zwykłym papierze. Być może ze StazOna jest
lekko rozmyta ale hej- w końcu to nie jest tusz do papieru. Interesujące
jest to iż Memento i Memento Luxe maja identyczną nazwę koloru, ale odcienie różnią się. Memento Luxe jest bardziej czerwonawym brązem i
stanowczo mniej spranym kolorem.
I expect my ink to be multipurpose product which I can use on may ways. So I tested my inks on different surfaces.
First one was textile. And I was really surprised about Memento Luxe. He sits on top of my surface and holds even washing. When I stamped on fabric - all Inks gave me good image but when I put my fabric to washing Memento start to bleed. Stazon and Memnto Luxe survived this pretty well.
Oczekuje ze tusz będzie multiproduktem który bede mogła wykorzystywać na różnych powierzchniach. Zrobiłam więc też test na tkaninie i wypadł rewelacyjnie. Bardzo zaskoczył mnie memnto luxe, chociaż nie byłam do niego przekonana. Po samym odstęplowaniu uzyskałam zadowalająca odbitkę ze wszystkich tuszy ale przy praniu klasyczny Memonto puścił mimo że powinien być to wododporny tusz. StazOn i Memento Luxe przeszły test bez problemu.
On thick cardboard they all worked pretty well, maybe again StazOn soaked in a surface.
Na grubszym papierze wyszło bardzo fajnie, być może StazOn delikatnie się rozmył jak przy zwykłym papierze.
On very smooth surface the very best result I have form StazOn. I used very smooth cardstock, something like photo paper but similar effect you will get on glass, glossy papers, gel medium, plastic foil etc..... but all inks holds on surface even when I added water.
Test na papierze woskowanym pokazuje, że najlepiej z takimi powierzchniami radzi sobie Stazon chociaz wszystkie tusze utrzymały się mimo zmoczenia papieru .
During tests I made whole page for my art journal just to test some abilities of my inks. Here is a video for you and in my opinions on each ink you will find below :
MEMENTO
Very good quality, quick drying archival ink. It will resist water, you can use it with alkohol markers. Ink gives you very nice sharp image. Nice one to stamps with many details. Doesn't fade with time and don't change color. It have really big color palette.
It's not permanent on Fabric and will not stay on hard surfaces like glass, foil plastic. But you can use it to stamp on paper, gesso and all kind or rather smooth but not gloss surface.
It blends really nice with sponge or blending tool.
Bardzo dobry szybkoschnący tusz. Jakość produktu jest naprawde widoczna . Tusz nie blaknie, jest odporny na wodę , szybko wysycha, można go używać z markerami alkoholowymi. Bardzo dobry do stempli z dużą ilością detali i delikatnych wzorów. Daje piękną precyzyjną odbitkę. Można uzyskać fajne efekty kolorystyczne, cieniowanie i ładne mieszanie się barw z pomocą gąbeczki i różnych odcieni tuszy. Nie działa na śliskich powierzchniach jak szkło plastik itp. Idealny do w miarę gładkich powierzchni jak papier czy gesso .
Nice special purpose ink. StazOn is perfect ink for those who use many surfaces but maybe not paper. You will get best results on gloss smooth surfaces. You can use it to decorate your furniture, textiles and most of surface you can think about. It will not work so well on textural background. On few kinds of paper I noticed marks of soaking in paper instead of nice sharp image. It's fast drying and waterproof. It's alcohol ink so it's smelly and will not work with markers.
Bardzo fajny tusz do zadań specjalnych i trudnych śliskich bardzo gładkich powierzchni. Działa idealnie na szkle plastiku, tkaninach skórze. Szybkoschnący tusz alkoholowy. Wydziela delikatny zapach i należy pamiętac żeby trzymać szczelnie zamknięty żeby nie zwietrzał zbyt szybko . Działa niezbyt ładnie na porowatej powierzchni na niektórych papierach może dawać efekt wsiąkania na krawędziach i niezbyt ostrej odbitki. Po wyschnięciu permanentny. Nie jest przeznaczony do użytku z markerami .
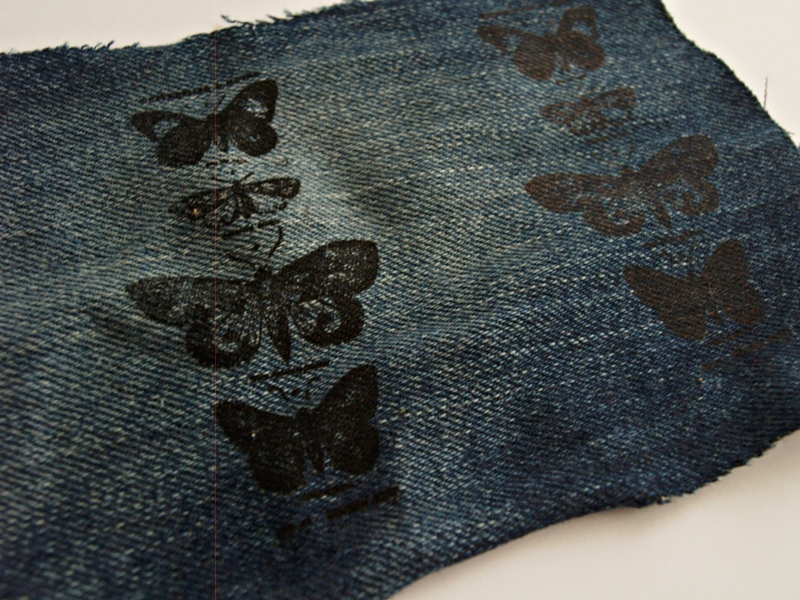
Very very very juicy ink. It works really good on plenty of surfaces. Including a little bit textured surface ( photo on denim below) Its perfect combination of pigment and archival ink.
Works almost on most of them but it needs time to dry. You can use a heat gun to dry it faster. After heating it will be permanent. Works on paper, wood , textile, paint, plastic .
I believe it will be my favorite ink. I did even embossing with it. Only minus is slow drying. This is a kind of archival pigment ink. It seats on surface like paint really opaque and give nice even cover. Not best ink to tiny details.
Bardzo bardzo bardzo soczysty tusz. Mam wrażenie, że jest to idealne połączenie tuszu pigmentowego i permanentnego. odbija idealnie także na trudnych powierzchniach ( porowatych patrz zdjecie odbitki na grubych dżinsach )
Działa praktycznie na każdej powierzchni ale potrzebuje dużo czasu żeby wyschnąć. Można używać nagrzewnicy do przyspieszenia procesu. Po wygrzaniu tusz staje się całkowicie permanentny. Trzyma się powierzchni jak farba akrylowa, daje fajne efekty na drewnie ( także surowym), wszelkiego rodzaju materiałach. Będzie idealnym narzędziem przy tworzeniu skomplikowanych teł, chociaż nie jest to najlepsze rozwiązanie do bardzo precyzyjnych stempli z dużą ilością detali .
Today I want to show you my typewriter from my magical world
and my wonderful scrapbook to sample od products.
My works were created thanks to the inspiration of two extraordinary artists: Tanya and Ingrid.
Inspired by the work of Tanya I decided to give my typewriter a new life.
Some time ago I saw the Ingrid's, who created a book with 13arts' products.
My eyes immediately went toward my notebook ... buuu, I thought that it can not be.
My magical world deserves pampering.
That's how my new pad on sample preparations was created.
It is wonderful and I love it.
It was made a few days ago but matches perfectly with the typewriter.
I'm delighted with the final result so I decided to show it
Dziś chcę pokazać maszynę do pisania z mojego magicznego świata
oraz mój cudowny notatnik na próbki preparatów .
Moje prace powstały dzięki inspiracją od dwóch niezwykłych artystek: Tanya i Ingrid
Zainspirowana pracą Tanyapostanowiłam dać mojej maszynie do pisania nowe życie.
Jakiś czas temu zobaczyłam praceIngrid , która stworzyła książkę na produkty 13 arts.
Moje oczy od razu powędrowały w stronę mojego zeszytu.. buuu, pomyślałam, że tak nie może być.
Mój magiczny świat zasługuje na dopieszczenie.
Tak powstał mój nowy notatnik na próbki preparatów.
Jest cudowny, uwielbiam go.
Notatnik powstał kilka dni temu ale idealnie komponuje się z maszyną do pisania.
Jestem zachwycona efektem końcowym, dlatego postanowiłam pokazać go.
details:
Before/ przed:
Step by step - tutorial
Step 1: After washing and drying my typewriter, I painted it with Gesso. Po umyciu i wyschnięciu maszyny do pisania, całą jej powierzchnię pomalowałam Gesso.
Step 2: I mixed two paints (Ayeeda Paint METALLIC! Blue and Ayeeda Paint - Pearl Silver) and painted the cover of the typewriter.
I painted other elements with pink paint mixed with modeling paste.
When I was painting, I started to rub the places that I wanted to be brighter.
I used tissues and Gesso to reach this effect.
Zmieszałam dwa farb (Ayeeda Paint METALLIC! Blue i Ayeeda Paint - Pearl Silver) i pomalowałam obudowę maszyny. Pozostałe elementy pomalowałam farbą metaliczną różową zmieszaną z pastą strukturalną. Kiedy skończyłam malować, zaczęłam pocierać miejsca, które chciałam, aby były jaśniejsze. Użyłam do tego chusteczek dla niemowląt i Gesso.
Step 3: I put Structural paste mixed with Ayeeda Paint METALLIC! - Pink trough a stencil Pastę strukturalną zmieszaną z farbą Ayeeda Paint METALLIC! - Pink nałożyłam przez maskę.
Step 4:
I started to decorate the typewriter: I glued: alphabet, nails, flowers, cutouts, etc. on the gel medium
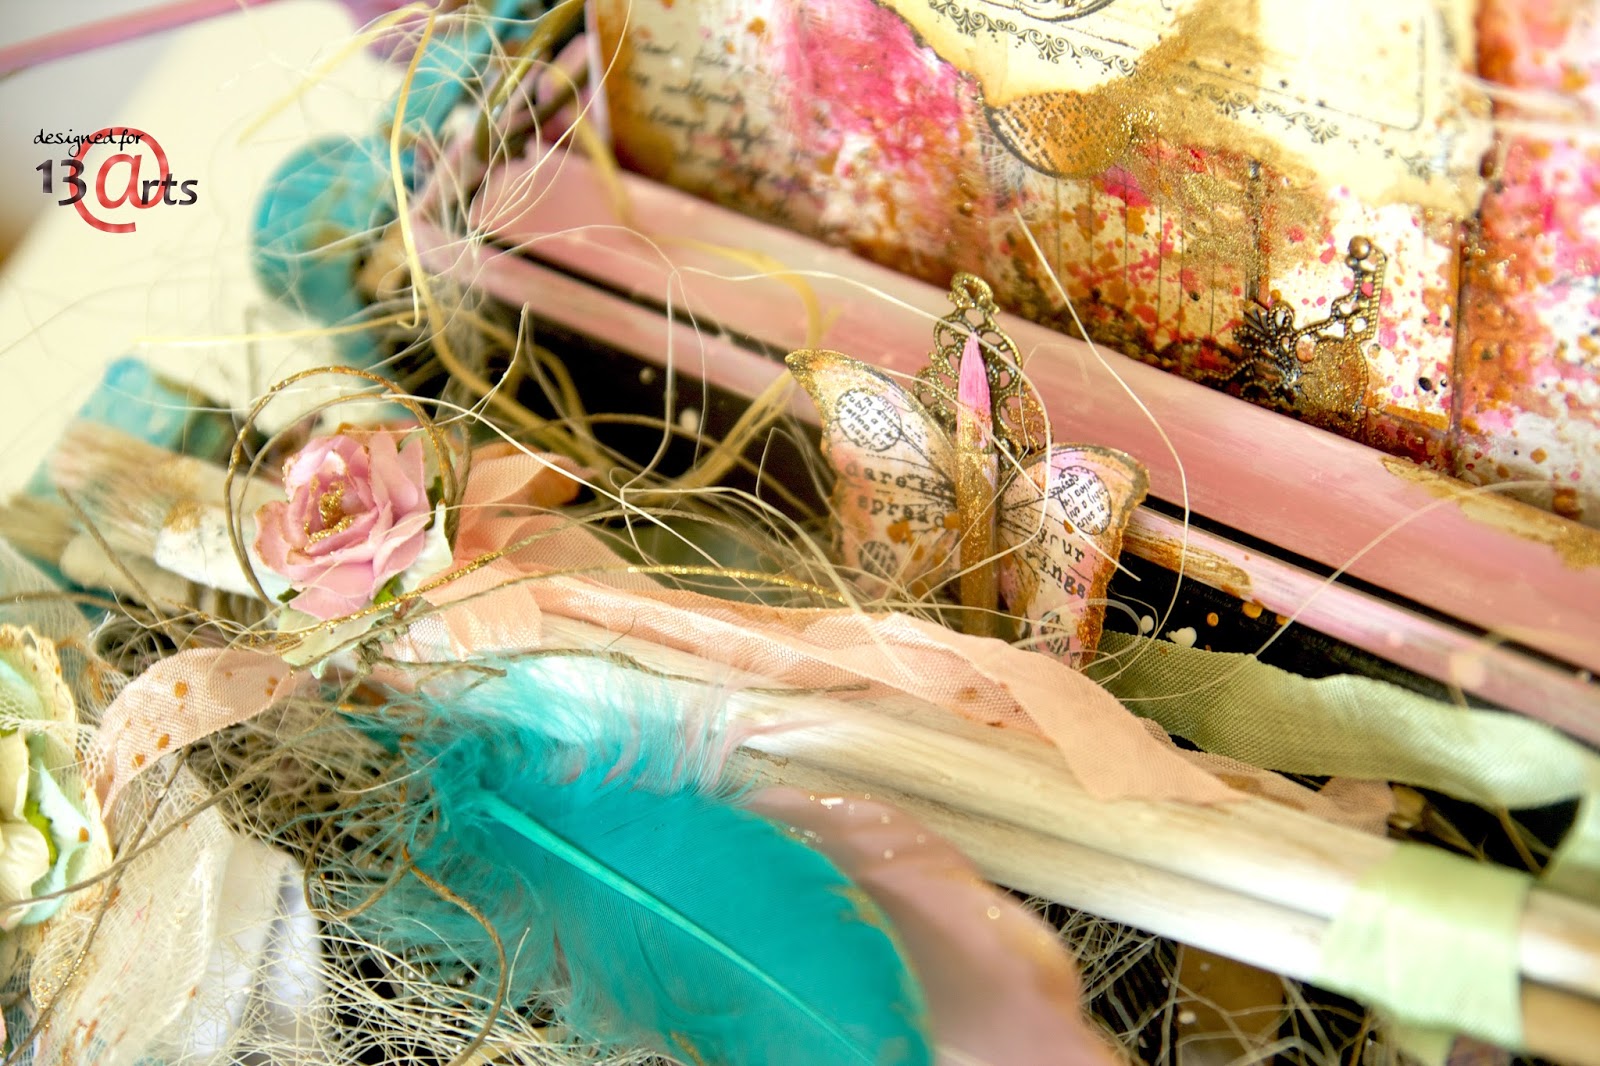
I painted the old brushes, decorate them with ribbon, a flower and feathers.
Flipped and cut stamp I embellished with paints,brush tip, and glued it all to the metal ornament.
Rozpoczęłam ozdabianie maszyny: przykleiłam na żel medium: alfabet, ćwieki, kwiatki, wycinanki, itd. Pomalowałam stare pędzle, ozdobiłam je wstążką, kwiatem i piórkami.
Odbity i wycięty stempel, ozdobiłam : farbami, końcówką pędzla, całość przykleiłam na metalową ozdobę.
Step 5: Everything is decorated with sprinkles of paints and inks and mist. Całość zdobię farbami i kropie tuszami i mgiełki.