Hi
everyone.... I hope you all had a wonderful Christmas and New Year!! I am very excited to be sharing with you my very first post as an Educator for 13 Arts. I have so many things I wish to share with you, but
we have lots of time, and today I thought I would start out simply and
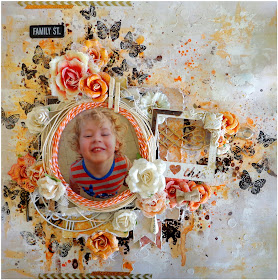
share this step-by-step tutorial of a layout I made just before
Christmas using lots of beautiful 13 Arts Papers and Mediums.
'Love This'
Step
1 and 2: Take a sheet of 13 Arts paper, I have used some from the
'Timeless' collection, and spread gesso on your background down the left
of the page, and coming to a point at the right center. Then using 13
Arts paint in a color of your choice, I have used peach, use an old
credit card to scrape some paint on randomly.
Steps
3 and 4: Add modelling paste through a stencil to your background
roughly in the areas of the gesso and paint. Let it dry. Next spray your
entire stenciled area with Ayeeda Pastel Mist in Antique Cream, then
while it is still wet add a few random sprays of Pastel Salmon, and some
drops of Orange Ink. Tilt the paper slightly in all directions letting
the colors blend together, then tilt upright to create some drips.
Steps
5 and 6: Next I have used Chalk Dark Brown Mist to create big splats
using a mask on the background, turning it over and stamping off excess
mist, then add some stamping. When my mists had completely dried I
decided that it was a little too bright and bold for what I wanted, so
I have taken a small paintbrush wet with water and 'scrubbed' some of
the
darker brown areas, using paper towel to deb off excess water and help
lift some of the color out.
Steps
7 and 8: I then spread small amounts of gesso around the background,
blending it in to soften some areas. I have added a strip of gold
chevron washi tape to the top and bottom of the page, along with a small
piece of gold glitter tape.
Steps
9 and 10: Next I have created my photo mat using a variety of papers
from quite a few different collections. I always distress the edges of
my paper for texture and separate each layer with foam tape for
dimension. When all my papers were stuck down I added some distressed
calico and a large circle of waxed cord, before mounting my photo above
it using foam tape, so that it does not dip in the middle. I then add
some more waxed cord and bakers twine, along with some splats of mist to
blend the papers in with the background.
Steps
11 and 12: Now comes my favorite part..... Embellishing!! I have taken a
Chipboard Polaroid frame from the Color Basic Collection, and painted
it white with gesso. I have added a resin piece to the top right corner,
and added some flicks of gold mist. I have also painted a chipboard
swirl from Dusty Attic with Ayeeda Pearl Gold Paint and Gold Glitter
Paint. I have glued this to the bottom pieces of my photo mat, then
layered the polaroid frame above it, adding a few flowers underneath on
the right to help keep it level with the papers. I have also added some
flowers in the bottom right corner of the photo, a few pegs on the top
left and chipboard clock painted white on the bottom left, and some
brown mica flakes underneath the polaroid frame.
Steps
13 and 14: Continue building up your embellishments. I decided to move
my pegs to the top right of the photo. They have been painted white with
gesso and Ayeeda Paint in Gold Glitter, very lightly. I have also
layered some flowers at the top of the photo. I have covered some
chipboard banners in paper from the 'Color Basics' collection and added
some modelling paste to the edges, layering them with foam tape beneath
the photo. I continue to build up my flowers around the photo, brushing
them all with gesso as I go.
Steps
15 and 16: Now that all your flowers are glued in place you can begin
to work on your finishing touches. I have added more brown mica flakes
to my layout, adding them beneath the banners at the bottom, and around
the flowers at the top and on the left. I have then added the 'Family
St' sign at the top, a key beneath the orange flower on the left, a
metal drop the says 'bliss' to the banners, and a bow on top of the
flowers beneath the polaroid frame. I finished of my page by using Gel
Medium to glue glass microspheres to the tips of some of my flowers, as
you can see in the photo on the right. I love doing this to my flowers.
It makes them look like they are covered in either ice, snow or water
droplets, depending on the light, and its very beautiful.
Thanks for joining me today! I hope you have found something in this tutorial to inspire you!!
Products Used:
Gesso
Modelling Paste
Gel Medium
Ayeeda Mist - Pearl Gold
Ayeeda Mist - Pastel Antique Cream
Ayeeda Mist - Pastel Salmon
Ayeeda Mist - Chalk White
Ayeeda Mist - Chalk Dark Brown
Ayeeda Water Ink - Orange
Ayeeda Glass Microspheres
Ayeeda Paint - Pearl Gold
Ayeeda Paint - Gold Glitter
Ayeeda Paint - Matte Peach
Timeless Collection - Papers
Color Basics Collection - Papers
Frosted Life Collection - Papers
Cozy Evening Collection - Papers
Color Basic Words - Chipboard


This is too gorgeous!!
ReplyDeleteawesome!!!
ReplyDelete