Home

Tuesday, 30 June 2015

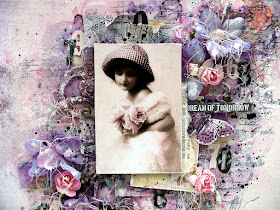
Dream of tomorrow - layout by Anna Rogalska

Hello!!! It’s Anna here. I would like to share another layout with you!
I stamped the background paper "Hallerbos" and added some gesso to create texture. 
I used different mists and paints to add more color to the project.

Witam!!! Tutaj Anna. Chciałabym pokazać wam kolejny mój layout. 
Ostemplowałam tło papieru "Hallerbos"  i dodałam trochę gesso by stworzyć teksturę. 
Użyłem różnych mgiełek i farb aby dodać więcej kolorów do projektu.


Here are some closeups of my work: 

Oto kilka zbliżeń mojej pracy:


I hope you found something in this post to inspire you! 
 
Mam nadzieję, że znalazłeś coś w tym poście, by poczuć się zainspirowanym!
 
Products 13@rts:
Mika naturalna w płatkach Purple 

******************
 
Thanks for visiting! Have a nice day!     
 
Dziękuję za odwiedziny! Miłego dnia! 

Anna Rogalska 

Monday, 29 June 2015

Twinkle Twinkle Little Star with Jelissa

Hello 13@rts friends! How are you this lovely Monday?

I have a special layout to share with you today, created with lots of fabulous products from the 13@rts store. 


This is a photo of the Milky Way which I shot while on holiday. Unfortunately it wasn't very well taken as I had all of 10 min to myself and it was freezing cold. Nevertheless, seeing it with my own eyes was one of the most breathtaking experience and I was glad to have shared it with my husband and children. It also was not a very easy photo to scrap because I wanted to re-create the feeling of a serene night sky and my usual style of flowers and layers definitely do not cut it here. So it was gathering inspiration from different ones and I must give credit to team mate Natalya Loi for the distinctive amazing way she works on her backgrounds!

More on the close-ups:


Lots of textural details here. I first dabbed black gesso with a sponge on the areas I wanted to work with, followed by dabbing on silver glitter paint. It gives a very beautiful effect of stars scattered across the night sky. I further emphasized the theme with the star stencil designed by Olga - using a mix of Metallic Old Silver paint with Magic powder to create a very fluid paste.

For the texture, I used microspheres in both plastic and silver versions, followed by some distress glitter and glass glitter from my own stash for an even more obvious sparkly effect. This was finished with some string - the Milky Way and our whole universe is held together by invisible strings known as gravity and I wanted to sneak the nerdy part of me into my art. I then patted on more black gesso with a palette knife for more foamy texture.


My title chipboards came from Olga's designs and it was simple silver glitter paint on top of black gesso. Under all the texture I had also used white matt paint on my script stamp and used it randomly over the page - just for contrast. I finally finished up the page with some stickles, dew drops, little wooden stars and splatters with Splash! acrylic ink.

And that's all I have for today. Hope you like this layout!


Sunday, 28 June 2015

A Start to Color Theory (Plus Video) with Jacqueline Moore

Hi 13 Arts fans!!!
During my post today and over the next few as well I am going to talk with you a little about color theory, and share a creation with you showing you my take on each color scheme.
There are many different color combinations you can use for example a Monochromatic color scheme which I am sure you are all familiar with. The next easiest to use is an analogous color scheme. This is when you use 2 or more (usually 3) colors that are next to each other on the color wheel, which is what I have based my creation on today.

A Color Wheel is made up of Primary, Secondary, and Tertiary colors. A regular color wheel will display shades (when black is added) on the outside, then working towards the center display tones (when grey is added), the hue (the color in its pure form), and finally in the center, tints (when white is added). A color wheel can have many different tints, tones and shades like the one one below.


A common belief when working with a color wheel is that you must pick just one color from each row, for example in the row of green which is a secondary color, you would have a dark green, emerald green, olive green, grey green, apple green, bright green, light green, ect. Many people feel that they can only pick one of these. This is not true. In a monochromatic scheme you would use all or just some of the different types of greens, and using an analogous color scheme, complementary or split complementary scheme, ect, is no different.

For my creation today, using an analogous color scheme I have selected the Blue/Green's, Green's, and Yellow/Green's. Not just a shade from one, a tint from another, ect, but many shades, tones, tints and hue's from each of these 3 columns, actually giving me quite a broad range of colors to work with.

I have also put together another YouTube video for you so you can see just how this layout came together.

'Happy Boy'


I didn't want to overpower my layout by using these colors in equal proportions so I have chosen the Blue/Green's as my focus colors with small amounts Green in the background and just a tint of Yellow/Green to accent.

Some close-ups:


  Here is the video:


 I will be back for my next 13 Arts post with more on Color theory, so make sure you stay tuned!!
I hope you enjoyed my post and thank you for stopping by!!!

13 Arts products used:
Mental Vacation Collection - Papers;  Starlight Collection - Papers;

Color Basic Collection - Papers;  Color Basic Mask - Squares;

Saturday, 27 June 2015

LO {neverending story} by Terhi

Hello everyone!

It's Terhi here today, sharing a layout with a process video below.
I got my inspiration from all the new stencils we have on Starlight and Mental Vacation collections. I wondered how many stencils can be included to one simple layout and got the answer during the process: quite many. I also got excited with splashes so I created some with Splash! Inks and with Ayeeda mists.


I made my title combining some chipboards "Starlight words" together. There are so many words in that set that it's easy to create titles with many words, even small sentences. I stick in "neverending" and "story" as the beach we found last summer reminded me about how life always continues, even when it feels bad.


Those chipboards got a new look and texture with a mix of paint and Magic Powder - you'll find the recipe from the video.


Hope you'll enjoy the video.
Thank you so much for popping in today!


13@rts products used:
Papers - Mental Vacation
Stencil - Stars

Friday, 26 June 2015

PRECIOUS MOMENTS IN TIME by Agnieszka Bellaidea

Witam , Bellaidea wita Was bardzo serdecznie, na dzis mam znowu blejtram, tym razem w moich ukochanych niebieskosciach.

Hi! Agnieszka Bellaidea today with my very blue canvas.


Pracowalam nad tym blejtramem tuz przed moimi warsztatami na ScrapFest  gdzie 13 arts bylo sposorem i wiem ze wiele nowych osob pokochalo nasze produkty :)


I was working on this canvas just before my Mixed Media class at ScrapFest, 13arts was a sponsor there and I know many new people are in love with our products :)


13arts products:

Medium żelowe- Gel medium MATT


Thursday, 25 June 2015

Mixed Media • Never stop DREAMING • by Nine

Hi !

Today I would like to try something different. I hope you'll like it !!


13@rts products used :

White gesso
Magic powder
Ayeeda mists :
Splash ink silver
Stencil "Set of circles"

Other : canvas, Tim Holts stamps, embossing powder

Thank you !

http://www.au-bout-de-mes-doigts-by-nine.com/

Wednesday, 24 June 2015

feel free canvas by Ingrid


Hi all!
Today I have a mini canvas, created with 13arts products.

Used a brayer to applying all the paints and a stencil to create the background.

The feel free, create art stencil from 13arts.

A lovely white metal butterfly.

A small piece of some decorative ribbon jets and flowers from Scrapberry's, 
also available in the 13arts store.

Used some gesso to lighten the edges.


13arts products used:

Enjoy your day!
Ingrid xxx


Tuesday, 23 June 2015

Mr & Mr - mixed media layout video tutorial by Ayeeda

Hello:) Today it's my turn to show you the creative process of my simple and quick mixed media layout. I have decided to use one of my older paper collections, I really like such comebacks sometimes:) Hope you'll enjoy my video and create something for you too. Here is my layout.

Witajcie:) Dzisiaj moja kolej, by pokazać Wam jak krok po kroku tworzę prosty mediowy layout. Zdecydowałam użyć papierów ze starszych kolekcji, lubię czasem takie powroty;)  Mam nadzieję, że spodoba Wam się mój kurs video i stworzycie również coś dla siebie.
Oto moja gotowa praca:

Mr & Mr


Video:


You can subscribe my youtube channel to see more of my videos.
Możecie użyć subskrypcji na moim kanale youtube, aby być na bieżaco i oglądać więcej moich kursów.


Supplies/Materiały:

Sponge/gąbka
Chipboard Color Basic

Pozdrawiam,
Regards,

Monday, 22 June 2015

Layout "La vie est belle" and video tutorial by Maryse Jolin


Hello everyone !!

Today I come to share a small creation that I had a lot of fun to make. 
I used the wonderful water paints and different mits of Ayeeda, they are just great, I love them !!
I made also a tutorial video on my page. 
I hope you will enjoy.


Bonjour tous le monde !!  

Aujourd'hui je viens vous partagez une petite création à laquelle j'ai eu beaucoup de plaisir à la confectionner.  J'ai utilisé les merveilleuses peintures à l'eau et différents vaporisateurs d'Ayeeda, ils sont tout simplement génials, je les adorent !! 
 J'ai aussi réalisé un vidéo tutoriel de ma page.  J'espère que ça va vous plaire.


And my creation.
Et voici ma création.


Some details.
De plus près.


My video tutorial.
Mon vidéo tutoriel.

Products 13@rts used:

paper color basic raspberry / starlight pegasus
white and black gesso
paint matte caramel / metallic pink
ink splash turquoise
mist pearl scarlet - turquoise
mist chalk fuchsia
gel medium matte
powder 3D natural mika flakes
glass filler microspheres
stencil - mental vaction tattered grid
embellisment elegy ScrapBerry's
flower cherry blossom ScrapBerry's
embellisment rose garden ScrapBerry's 


 Thank you and see you soon !!
Merci et à très bientôt !!